Wednesday, 20 November 2013

Stem Ginger Shortbread

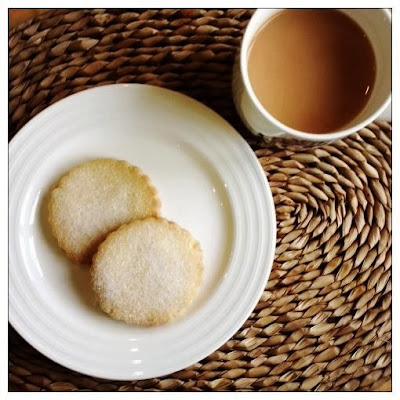
There is very little to say about these biscuits other than to note that whilst they may look plain they do in fact, pack a real gingery, buttery punch of flavour.
 
The dough that I use to make these biscuits is my basic shortbread dough to which I add ground ginger and some finely chopped preserved stem ginger.
 
I roll out the dough to a thickness of about 1cm and then stamp out individual discs using a 6cm round-fluted cookie cutter. You can use cookie cutters in other shapes but, for these biscuits, I favour the restrained elegance of the fluted cutters.
 
Most types of shortbread biscuits are enhanced by a light sprinkling of caster sugar when they emerge just baked and hot from the oven - so that is what I do here. I love the way some of the tiny, sweet crystals always cling to my mouth after each bite of biscuit, forcing me to lick my lips and submit myself to another gentle kiss of sugar.

Shortbread contains very few ingredients and as such I really believe that you need to use the best that you can find. In particular, I urge you to use quality butter; the better the quality of the butter, the better the flavour of the finished biscuits.
 
One final piece of advice… These biscuits are wonderful with a nice cup of tea. The modern world can be a stressful and busy place, so it’s lovely making time to indulge in simple pleasures such as a cup of tea and a few homemade biscuits.


Ingredients:

300g plain flour
200g butter, softened
100g caster sugar plus a little extra to sprinkle over the shortbread
½ tsp ground ginger
3 balls of stem ginger from a jar of preserved ginger
 

Method:

1. Preheat the oven to 170C/Fan Oven 150C/Gas Mark 3. Line a baking tray with non-stick baking parchment and set aside.
2. Place the butter and caster sugar in a large bowl and using a hand-held electric whisk, beat together until light and fluffy and a pale colour. Finely chop the stem ginger into small dice and set aside.
3. Sieve the flour and ground ginger together, add the diced stem ginger and work into the butter and sugar mixture with a wooden spoon to form a dough. Knead briefly with your hands to bring together into a bowl and place on a lightly floured work-surface.
4. Use a rolling pin to roll out the dough until about 1cm thick and using a 6cm round fluted cookie cutter, stamp out discs of the dough. Place on the lined baking sheets leaving space between each biscuit.
5. Bake in the preheated oven for approximately 20 minutes until the shortbread is a light golden colour. Remove from the oven and lightly sprinkle with a couple of tablespoons of caster sugar. Leave to cool. The shortbread keeps very well for several days in an air-tight tin.
 
 
Makes 18 Biscuits.


Tuesday, 19 November 2013

Hazelnut Cake

I have been experimenting with hazelnuts again! Ever since I managed to get my hands on a bottle of Frangelico, an Italian hazelnut flavoured liqueur, I have become more than a little obsessed with all things to do with hazelnuts.
 
Yesterday was cold and gloomy yet again and SHOCK... HORROR, the weather forecasters were predicting a strong likelihood of light snow falling in parts of the country. We are definitely in winter now! However, there is a lot to recommend this time of year, not least of which is a ready excuse to try out and to develop new recipes that I have been meaning to get to for quite a while. To be honest, it’s too cold and dark outside to do much else in the evenings.
 
Like a little squirrel, which had accumulated a rich store of nuts to sustain themself through the season when Winter disdainfully stretches out her icy fingers, I set to preparing the hazelnuts for the cake that I had decided I was going to bake.
 
I quickly decided that I did not want to include chocolate in the cake that I was going to bake. I wanted it to be about the hazelnuts in all their glory. There is no doubting that hazelnut and chocolate is a marriage made in heaven, but I wanted to focus on the hazelnuts alone.
 
I used whole hazelnuts, which had already been skinned. I have previously spoken in another post about my hatred of certain culinary tasks and skinning nuts is at the forefront of this list. So I decided to spend a little extra and buy ready-blanched nuts. I roasted the nuts on a baking tray in a hot oven for approximately 7 minutes until they had darkened in colour and the kitchen had taken on their sweet, nutty aroma. You do need to watch the hazelnuts carefully, because they can burn very easily. It is worth roasting the nuts because it really brings out the flavour of the nuts.
 
When the nuts had cooled completely I whacked them into my mini food-processor and ground them until fairly fine, but still retaining some texture. If you over-grind them, the oils in the nut are released, resulting in a type of hazelnut butter which is not what I wanted in this recipe.
 
I made a basic Madeira-like sponge cake recipe and folded in the nuts at the end just prior to baking. I wanted to achieve a cake that had a close crumb, but was still had a lightness about it. I felt that anything too spongy with a very aerated crumb would conflict with the texture of the hazelnuts. (You will note that I did not use any raising agent in the cake but I made sure that I creamed the butter and sugar together until really light and fluffy and I also sifted the flour twice). I also chose to include some vanilla paste as I thought that the floral notes in the vanilla would complement and accentuate the hazelnut flavour I wanted to achieve.
 
I thought a little about whether to ice or glaze the cake and if so, what to use. I decided against using a buttercream this time, and instead opted for a caramel glaze which I then sprinkled with some roughly chopped roasted hazelnuts. Caramel has a natural affinity with all nuts and this was certainly the case here. Next time, and there will be a next time, because this cake was so delicious, I think I will split the cake into three layers and sandwich the layers together with a hazelnut praline buttercream but I will still cover the cake in the caramel. If you want a simple cake, just follow the recipe that I present here. It really is yum! I am going to try out the buttercream idea and will report back.
 
Postscript: I have now made this recipe twice; once with standard plain flour and once with Tritamyl Flour, which can be consumed by coeliacs. There was very little difference between the two, but if I was pushed, I would say that the latter did not rise quite as much. Both cakes were lovely!

Ingredients:

Cake:
200g butter, softened
200g caster sugar
200g plain flour, sifted
4 eggs
½ tsp vanilla paste
125g ground hazelnuts
Caramel Glaze:
100g caster sugar
1 tsp lemon juice
3 tblsp water
125ml double cream
To finish:
1 tblsp of roughly chopped roasted hazelnuts

Method:

1. Preheat the oven to 170C/Fan Oven 150C/Gas Mark 3. Grease and line the bottom of a deep 23cm round cake tin with baking parchment and set aside.
2. Place the softened butter and caster sugar in a large bowl and using an electric hand-held whisk, beat together until light and fluffy. Take your time doing this to ensure that they are well mixed.
3. Add the eggs one at a time and continue beating ensuring that each egg is well mixed I before you add the next. Add the vanilla paste and mix thoroughly.
4. Next add the sifted flour and the hazelnuts and fold into the egg and sugar mixture. Once thoroughly mixed, pour the cake batter into the prepared cake tin and place into the pre-heated oven for approximately 50 minutes. Check the cake after about half an hour and if it looks like it is browning too rapidly, cover with a little aluminium foil.
5. To test whether the cake is cooked through, insert a thin skewer. When withdrawn the skewer should not have any raw or undercooked cake batter on it. Remove from the oven and allow cool in the tin for about ten minutes. When cool enough to handle, remove from the tin and allow cool completely on a wire rack.
To make the caramel glaze:
6. Place the sugar, lemon juice and water in a small saucepan and bring to the boil over a high heat. Stir continuously. After a couple of minutes a caramel will start to form. Allow it to turn a dark caramel colour and then remove the pan from the heat.
7. Carefully and slowly pour in the double cream, still stirring until you have a smooth caramel. Be very careful when adding the cream as the mixture can splutter and bubble up furiously.
8. Allow the caramel to cool in the saucepan for about five minutes and when it has thickened slightly, but still liquid, pour it onto the top of the cake and smooth out with a small palette knife so that the top and sides of the cake is evenly coated. Sprinkle a few roughly chopped toasted hazelnuts over the top of the cake and allow stand at room temperature for 2-3 hours so that the glaze can set.
 
Serves 8-10.

Simple Shortbread

Gosh! I must be on a bit of a biscuit binge at the moment… but here is another simple biscuit recipe that tastes delicious and is extremely versatile.
 
What I love about this recipe is that the ratio of ingredients is so easy to remember and is basically 3:2:1 of plain flour:butter:sugar. It is a classic shortbread recipe which I have baked here in the shortbread mould that I recently bought but you could just as easily make individual biscuits by rolling out the dough to about half a centimetre thick and using a circular 6cm cookie cutter to stamp out. You can make thinner biscuits, but you will need to decrease the baking time.
 
The basic dough can be flavoured with lemon or orange zest or you can experiment using different spices. I sometimes make thin, individual biscuits flavoured with freshly ground black pepper which I serve as an accompaniment to the strawberry mousse that I often make when fresh Irish strawberries are in season (these may sound a little odd, but the pepper compliments the strawberries so wonderfully). The point is that this recipe is extremely versatile provided you keep to the basic ratios given above.
 
If I were to impart any advice, it would be to use the best butter that you can lay your hands on. You can use unsalted butter, but if I’m completely honest, I rarely do because I like the very subtle salty flavour. This is NOT a recipe where margarine can be substituted. It has to be butter and given that I believe that Ireland produces the best butter in the world – I always use Irish butter!
 
My food obsessions not only include the eating of food, but also cover an OCD like compulsion to continuously add to my extensive food book and magazine collection. I am a complete sucker when it comes to buying new cake tins and other kitchen equipment. I'm lucky in that I have quite a lot of storage space in my kitchen, but every cupboard is overflowing with various tins, tools and implements.
 
My two daughters love all things even vaguely related to One Direction and whilst I'm sure that I would find it amusing to meet Harry, Louis, Zayn and the other 1D boys, it would be nothing compared to the idiotic, incoherent, star-struck fool I would become if I met some of my favourite chefs. I would be an absolute simpering eejit. Alas, the opportunity to do this does not look like it’s going to present itself in the near future so I shall continue to console myself with the acquisition of more cookery equipment!
 
My latest purchase was a circular wooden shortbread mould, into which you place your shortbread dough to imprint a pattern before removing from the mould prior to baking. I found that it worked very effectively although the thistle pattern which was carved into the wood did not imprint as distinctly as I had hoped it might.

Ingredients:

300g plain flour
200g butter, softened
100g caster sugar plus a little extra to sprinkle over the shortbread

Method:

1. Preheat the oven to 170C/Fan Oven 150C/Gas Mark 3. Line a baking tray with non-stick baking parchment and set aside.
2. Place the butter and caster sugar in a large bowl and using a hand-held electric whisk, beat together until light and fluffy and a pale colour.
3. Add the flour and work into the butter and sugar mixture with a wooden spoon to form a dough. Knead briefly with your hands to bring together into a bowl and place on a lightly floured work-surface.
4. Divide the dough in half with a sharp knife. Form each half into a circle and roll out gently with a rolling pin until it is roughly the size of your shortbread mould (My mould is 20cms wide). Lightly flour the mould and press the dough into it. Gently remove and place on one end of the lined baking tray. Repeat with the rest of the dough.
5. Bake in the preheated oven for 25-30 minutes until the shortbread is a light golden colour. Remove from the oven and score each round into eight wedges and lightly sprinkle with a couple of tablespoons of caster sugar. Leave to cool. The shortbread keeps very well for several days in an air-tight tin.
Makes 2 rounds of shortbread.

Monday, 18 November 2013

Ginger Snaps

Ginger in all its guises is just the MOST wonderful spice.

Without a doubt my favourite things to have with a good strong cup of tea, are a slice of liberally buttered homemade ginger cake (which I make with ground ginger, grated fresh ginger and some finely chopped stem ginger) or ginger biscuits.

I have always had a particular fondness for ginger snaps with their cracked surfaces, crunchy texture and strong flavour hit of ginger. Luckily these are one of the easiest biscuits to make and they taste far superior to their mass-produced counterparts. They are great to bake with children, who love dividing up the dough into small balls, rolling them between their hands and then flattening them on the baking trays prior to cooking. 

These biscuits use ground ginger which gives a spicy, almost peppery warmth that just goes so well with strong hot tea. In fact, I believe that these biscuits, although a treat must also have psychological and health benefits, because I always feel so good after eating them. 

There’s nothing frivolous or over-the-top about these biscuits. They are what they purport to be; - ginger biscuits. However, they should not be dismissed as run-of-the-mill or ordinary because these are biscuits that are easy to make, straightforward and reliable in character and… oh… almost forgot - they taste so good! 

Ingredients:

350g self-raising flour
Pinch of salt
200g caster sugar
1 tblsp ground ginger
125g butter
75g golden syrup
1 egg, beaten
Grated zest of half an orange

Method:

1. Preheat the oven to 160C/Fan 140C/Gas Mark 3.Line two baking trays with non-stick baking parchment.
2. Sift together the flour, salt, ground ginger and bicarbonate of soda into a large mixing bowl. Add the caster sugar and stir with a wooden spoon to mix into the other dry ingredients.
3. Heat the butter and golden syrup in a small saucepan over a moderate heat until the butter has melted. Remove the saucepan from the heat and allow the mixture to cool slightly before adding to the dry ingredients. Mix thoroughly to form a firm dough. Use your hands to shape the dough into approximately 30 small, even-sized balls.
4. Place the balls onto the baking sheet leaving space between them so that they have enough room to spread out. Flatten slightly with your fingers. Bake in the pre-heated oven for approximately 15-20 minutes until cooked through and a rich golden colour. Allow to cool on the trays for about five minutes and then, when cool enough to handle transfer to a wire rack to cool completely. When they are first removed from the oven, the biscuits will appear quite soft, but don’t worry the biscuits quickly firm up on cooling. These biscuits can be stored in an air-tight container for three or four days.
 
Makes approximately 30 biscuits.

Pickled Pears

I do love pears. When they are at that moment of optimum ripeness, there really is nothing to beat them. Apples are undeniably popular and this is due in part to their versatility, but the complexity of flavour that a perfectly ripe pear possesses is something that, in my opinion an apple never achieves.

Pears are wonderful used in cooking, and have something valuable to contribute to a range of sweet and savoury dishes. They are easily preserved and made into different chutneys, jams and pickles.

Pears are abundant in Autumn, although they can be a little tricky to cultivate if grown on an exposed, windy or cold site. Certainly, I have never been able to grow them successfully because of prevailing chilly winds where I live! Thankfully a number of different Irish varieties are available in supermarkets and greengrocers at a reasonable cost when they are in season. I tend to bulk buy them at this time of year and celebrate the many different dishes that I can create using them.

There’s something about making jams, chutneys, pickles and other preserves that really appeals to me. I love the somewhat romantic notion that I have developed of having food available during the “long, hard Winter” The irony of this is not lost on me given the fact that in the modern world all you have to do is walk into a shop and there are so many different foods that can be bought, but still, every year I like to bottle and preserve some fruits and vegetables.

This pickle is great and extremely easy to make. 1 kilogram of small to medium pears will yield three 500ml jars of pickled pears. I really do urge you to store the pears for at least a couple of weeks before eating them, because the flavours mellow and become almost sweeter but without being overly so. I particularly like eating these pears with cold meats at Christmas, but I recently tried them with some home-made vanilla ice-cream as a dessert and they were also delicious. In fact they made quite a sophisticated dessert and the sour acidity of the vinegar was well-offset by the sweetness of the sugar and the cinnamon.

Ingredients:

1kg pears
425g granulated sugar
400ml cider vinegar
200ml white wine vinegar
6 cloves
3 star anise
12 black peppercorns
1 cinnamon stick broken in two
4 strips of orange rind
4-6 slices of fresh root ginger root, peeled

Method:

1. Put all the ingredients except the pears into a large heavy based saucepan and bring to the boil over a high heat. Turn the heat down so that the pickling sauce is gently simmering and stir until the sugar is completely dissolved. Remove from the heat and leave aside while you prepare the pears.
2. Peel and halve the pears trying to retain a small length of the stalk at the top of each pear. I find it useful to use a very small sharp knife when doing this. Use a melon baller or small teaspoon to neatly scoop out the pear cores.
3. Place the pears in the pickling liquid and heat up over a moderate heat and allow simmer until just tender. This should take about twenty minutes, but to be honest the timing completely depends on the pears that you have used.
4. Once the pears are ready, remove them with a slotted spoon and place in sterilised 500ml jars. I used Kilner Jars.
5. Continue to boil the pickling liquid until it reduces and becomes quite syrupy, but do remember that it will thicken more as it cools. Strain the syrup over the pears, but scoop out the cloves, star anise, peppercorns and cinnamon and add to the jars. Do not add the orange rind or root ginger.
6. Seal the jars and store for at least a week before eating. They can be stored for up to 6 months in somewhere cool and dark.

Makes 3 x 500ml jars.