Pages

Monday, 27 January 2014

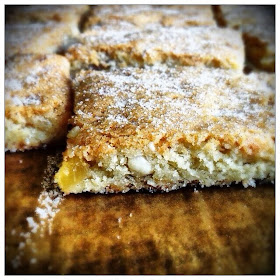
Ginger & Almond Traybake

These biscuits are so quick to make and are incredibly delicious. If, like me, you are a fan of ginger, you will absolutely love them. The first time that I made them I was hooked and I have made them many times since. Everyone who has tasted these biscuits has begged me for the recipe, so here it is now!

Although I regularly use stem ginger preserved in syrup, here I use crystallized ginger which I chop into small little cubes. The smell of the warm, sweet spicy, ginger as these are baking is addictive. Try as I might, I find it impossible not to wolf down one as soon as they come out of the oven and before they have had a chance to cool down.

It’s hard to describe these biscuits; on one hand they have a slightly cake-like, chewy texture but they are also reminiscent of shortbread. Quite a lot of butter is used, but rather than make the biscuits greasy, it imparts the most wonderful rich buttery taste. Because of the large amount of butter, you do need to keep an eye on them whilst they are in the oven to ensure that they do not over-brown as this will only make the end product taste a little bitter. Remove them from the oven once they are golden brown.
 
The inclusion of chopped almonds is only something that I introduced fairly recently, but I think that the chopped nuts add that something extra and really make something that looks quite plain into a luxurious tasting treat.
 
There is very little more that I can say about these biscuits other than to recommend that you bake some!
 

Ingredients:

260g plain flour
220g caster sugar
125g crystallised ginger, coarsely chopped
75g blanched almonds, coarsely chopped
1 egg
185g butter, melted
To finish:
2tblsp caster sugar, to sprinkle

Method:
1. Preheat oven to 170C/Fan Oven 150C/Gas Mark 3. Line a 20cm x 30cm traybake tin with non-stick baking parchment.
2. Place the flour, caster sugar, chopped ginger and chopped almonds in a large bowl and mix together with a wooden spoon. Add in the beaten egg, followed by the melted butter and mix again to thoroughly combine everything. The mixture will be relatively soft.
3. Press this mixture into the parchment lined tin, smoothing it down evenly with the back of a metal spoon.
4. Bake in the preheated oven for 30 minutes until golden brown and cooked through. Remove from the oven and sprinkle with a couple of tablespoons of caster sugar. Allow to rest in the baking tin for 10 minutes and then remove. Cut into 16 even sized pieces and allow to finish cooling on a wire rack.

Makes 16.


Blood Orange Cake

For a cake that uses fruits available in this part of the world during the depths of winter, this is actually a welcoming and cheerfully summery looking cake.

Blood oranges tend to be slightly tarter than other oranges but I think that this is what gives this cake an added sophistication and makes it all the more inviting.

This is the type of cake that could be served as it is ideal for serving as a dessert, still slightly warm from the oven with a dollop of crème fraiche. Alternatively, you could serve it with a scoop of ice-cream, but I think the slight acidity of the crème fraiche is exactly what is called for here, so that is what I would suggest.

As with so many sweet recipes that include citrus fruits, you can interchange the fruits used quite easily. This cake would work equally well with ordinary oranges, with lemons or even with limes. If I were to use limes, I think I would add in a couple of heaped tablespoons of desiccated coconut and would omit the orange flower water substituting the finely grated zest and juice of a couple of limes to give a slightly tropical interpretation to the basic recipe given here. Lime or lemon marmalades could also be used in place of the orange marmalade to complement the chosen fruit.
 
This cake is extremely moist with a beautiful orange taste. Upside down cakes always seem to invite gasps of appreciation when they are up-turned onto the serving plate and I have to admit that because of this, I tend to make sure I have an audience when the big unveiling happens.
 

Ingredients:

Topping:
25g butter, for greasing cake tin
1 blood orange, thinly sliced
3-4 tblsp granulated sugar
Cake:
200g butter, softened
200g caster sugar
3tblsp orange marmalade
4 large eggs, lightly beaten
200g self-raising flour
50g ground almonds
½tblsp orange flower water

Method:

1. Preheat oven to 180C/Fan Oven 160C/Gas Mark 4.
Topping:
2. Generously grease the bottom and sides of a 23cm round cake tin with butter and sprinkle in the sugar. Arrange the sliced orange slices on top of the sugar, overlapping to fit them in if necessary.
Cake:
3. Using a hand-held electric mixer, cream the butter and caster sugar together until light and fluffy and then beat in the marmalade. Next beat in the eggs a little at a time. Fold in the flour and ground almonds and mix in the orange flower water.
4. Spoon the cake batter into the prepared cake tin and spread out the mixture evenly. Bake in the pre-heated oven for 45 minutes until a inserted skewer comes out clean.
5. Leave to rest for 5 minutes and then turn out carefully onto a serving plate.
6. Serve warm with a spoonful of crème fraiche.

Serves 8-10.


Sunday, 26 January 2014

Onion Tarte Tatin

It is always great to have a number of recipes in your repertoire that are easy to prepare and can be made from standard everyday ingredients.
 
At its simplest, this Tarte Tatin uses onions, puff pastry and butter – but it is one of those recipes which can be adapted and other flavours easily introduced. I used ordinary yellow skinned onions and made one large tarte tatin which I then served sliced in wedges, but you could also make individual tartes using baby onions. I added a generous splash of Pedro Ximinez sherry and a few sprigs of fresh rosemary to the onions. I particularly liked the almost astringent taste of the rosemary contrasted against the sweetness of the onions and the richness of the buttery puff pastry. You can of course vary the herbs and rather than using sherry, brandy could be used in its place.
 
This dish contains no meat so it would be ideal to serve to non-meat eaters, but I also make it as a side-dish to accompany roast beef.
 
Every now and again, I will apply myself enthusiastically to the task of making homemade puff pastry, but as I have said before, there is nothing wrong about using store-bought puff. As always, I would recommend paying the little extra and getting an all-butter version as you will be rewarded with a far tastier finished product.
 
I like to serve the cooked tarte tatin still warm from the oven. Be careful when turning it out of the pan onto the serving plate as some hot buttery juices can easily escape. I promise you that for something so simple to make, there will be many “ooohs” and “aahs” when you serve this up.

Ingredients:

250g all-butter puff pastry
35g butter
5-6 small onions cut, peeled and cut in half through the centre
75mls Pedro Ximinez or Fino sherry
Some sprigs of fresh rosemary
Salt & freshly ground black pepper to season
 

Method:

1. Preheat the oven to 200C/Fan Oven 180C/Gas Mark 6. Melt the butter in a 23-25cm diameter frying pan, over a moderate heat on the hob. Make sure to use an oven frying pan. Add the onion halves, cut side up and fry over a low heat for 8-10 minutes. Turn the onions over after about 5 minutes.
2. Add the sherry, season well and cover with some tin-foil. Place into the oven and cook for about 15 minutes until the onions are soft.
3. Roll out the puff pastry until it is about 3mm thick and cut out a circle about3cms wider all round than the frying pan. Prick all over with the prongs of a fork.
4. Take the frying-pan out of the oven and allow the onions to cool in the pan for about 5 minutes. Remove the foil lid. Sprinkle some small prigs of onion between the onions. Put the pastry on top of the onions, tucking the pastry in around the edges. Bake in the oven for approximately 20 minutes until the pastry is well-risen and a deep golden colour.
5. Remove from the oven and allow to cool for about 5 minutes before up-turning onto a plate. Be careful – it will be hot.
6. Serve cut into wedges.

Serves 4.


Anzac Biscuits

ANZAC biscuits are steeped in history and were first made to send out to the soldiers in the Australian and New Zealand Army Corps (ANZAC) during World War I. Original recipes for the biscuits were plainer than they are today and did not include butter, golden syrup or desiccated coconut. They were made without the addition of eggs to improve their keeping qualities on the long sea journeys when they were being shipped out to the soldiers. These biscuits are traditionally served on ANZAC Day - a national holiday celebrated annually in Australia and New Zealand on the 25th April.
 
Although they look like quite a simple, plain biscuit their no-nonsense appearance belies how delicious they are. I first tried them as a young child when we were living in Brisbane, Australia and have always enjoyed them. The oats and coconut combination is extremely tasty and the inclusion of golden syrup gives the finished biscuits a slightly chewy texture.
 
You could drizzle the finished biscuits with some melted chocolate, but to be honest, I really don’t think that this is necessary… sometimes less is more!
 
The biscuits are incredibly simple to make and there is no creaming or rubbing-in required. Make sure to leave plenty of space between the cookies when you place them on the baking tray – they spread out a lot.

Ingredients:

150g plain flour
165g caster sugar
100g rolled oats
90g desiccated coconut
125g butter
90g golden syrup
½ tsp bicarbonate of soda
1tblsp boiling water
 

Method:

1. Preheat the oven to 180C/Fan Oven 160C/Gas Mark 4. Line two large baking trays with non-stick baking parchment and set aside.
2. Sift the flour into a large mixing bowl and add the sugar, oats and desiccated coconut. Give the ingredients a stir with a wooden spoon to mix them and then make a well in the centre.
3. Place the butter and golden syrup in a medium sized, heavy-based saucepan. Stir over a gentle heat until the butter has melted and the mixture is smooth. Remove from the heat. Separately dissolve the bicarbonate of soda in the boiling water and immediately add into the melted butter and golden syrup. The mixture will immediately expand, but don’t be alarmed this is meant to happen. Quickly pour this into the dry ingredients and stir using a wooden spoon until everything is well combined.
4. Divide the mixture into 22-24 pieces and roll each piece into a ball. Place on the prepared baking trays leaving a generous amount of space between each ball of dough. Flatten slightly with the bottom of a glass.
5. Place in the preheated oven and bake for approximately 12-15 minutes until the biscuits are a lovely golden colour. Leave on the trays for about five minutes and then remove to wire racks to cool completely.

Makes 22-24 biscuits.


Saturday, 25 January 2014

Eccles Cakes

Eccles Cakes are rich little pastries filled with spiced currants and are something which I think are gorgeous to nibble on with a cup of strong tea. I sometimes wonder whether my addiction to tea fuels the preferences I have for baking and cooking certain dishes… It’s almost as if I feel more compelled to make things that will pass my “will taste great with a cuppa” test!
 
These little pastries hail from the town of Eccles, just outside of the Greater Manchester area in the North of England. As with so many traditional recipes that have been around for years, their actual inventor is not known, but this is matter-less as they are still a much beloved treat in England.
 
The first time that I ever came across Eccles cakes was reading a recipe for them in my grandmother’s favourite cookbook. This was a book that contained no photographs or even drawings to assist the cook, so the only sense you got of the different recipes was by reading through the ingredients list and the recommended cooking method for each. I think that this is when my great love of cookbooks was awakened, because as a young child aged about 8 or 9 I loved reading this sturdy tome and imagining how the different dishes would taste. Eccles Cakes were something that always fascinated me, but I didn’t actually taste one until many years later, and I was hooked.
 
I love them. Yes… they are quite heavy and on the sweet side, but this is compensated for by the flakiness of the pastry. They are not something that I would necessarily bake regularly, but every time that I do, I always wonder why I don’t make them more often. Chorley Cakes are similar to Eccles Cakes but use shortcrust pastry and are not usually sprinkled with sugar prior to baking… but for me Eccles Cakes are the tastiest of the regional variations and are the one that I would prefer to make.


Ingredients:

75g butter
150g soft brown Muscovado sugar
150g currants
1 teaspoon of ground cinnamon
½ tsp freshly grated nutmeg
Finely grated zest of 1 orange
50g finely chopped candied peel
250g all-butter puff pastry
To finish:
1 egg, lightly beaten with 1tblsp milk
Some caster or nibbed sugar for sprinkling

Method:

1. To make the filling, melt the butter in a small saucepan and add in the rest of the ingredients other than the puff pastry. Set aside to cool.
2. Preheat the oven to 220C/Fan Oven 200C/Gas Mark 7. Line a large baking tray with parchment paper.
3. Roll out the puff pastry to about 3mm thickness and cut out rounds of the dough using a 10cm cookie cutter. Put a teaspoon of the cooled filling into the centre of each round. Brush around the edge of the pastry round with a little of the beaten egg/milk mixture. Bring the edge of the pastry together in the centre encasing the filling and make sure that you seal it together well. Turn the sealed Eccles cake over flatten the cake with your hand until it is about 1cm thick and pat into an oval or round shape. Place on the prepared baking sheet and repeat this process with the remaining pastry and filling.
4. Using a small sharp knife, slash each Eccles cake twice, this is to allow steam to escape. Brush each cake with some of the remaining egg wash and sprinkle with caster or nibbed sugar. Bake in the preheated oven for approximately 15 minutes until golden brown. When cool enough to handle remove to a wire rack to finish cooling.
 
Makes 8. 


Marmalade Flapjacks

I am ridiculously pleased with the orange marmalade that I recently made. Three batches and over twenty jars later, with a kitchen that was beginning to resemble a jam factory, I was a little concerned that I might have approached the whole task a little over-enthusiastically! Reflecting on my productivity, I realised that I would have no problems using the marmalade in a variety of ways other than just as a spread on my obligatory slice of toast in the morning. In fact, I actually grew anxious, worrying about whether I had made enough!
 
My grandmother used to make the tastiest flapjacks. Sometimes they were chewy, sometimes they were crunchy, but they always tasted delicious! As such, I always think of her whenever I eat them.
 
The great thing about flapjacks is that they are so simple to make and are ready in no time at all. I often add some chopped stem or crystallised ginger or a couple of handfuls of raisins to the basic recipe. This is one of those recipes where you really can be a little bit inventive.
 
Given the vast stores of marmalade that I have recently produced, it occurred to me that the addition of some marmalade to my basic flapjack recipe might be rather nice.
 
These flapjacks do not include any flour so the end result is almost toffee-ish! A kind of oaty toffee if you will. The mixture will bubble away in the tin and after the 35 minutes are up will still look quite slack and runny. On cooling everything firms up, so don’t worry. In fact, it is better to slightly undercook the flapjacks because if over-baked they will be quite challenging to chew. The addition of flour results in a more cakey, but equally delicious biscuit. Just add in a couple of heaped tablespoons of plain flour when you add the oats.
 
I was extremely happy with the end result. The slightly bitter edge of the marmalade really works well with the oats and because the marmalade that I had made was a coarse cut marmalade, I kept chancing upon little nuggets of orange peel as I munched my way through a flapjack. You can leave out the marmalade if you prefer. I also decided that I would drizzle the finished flapjacks with a little dark chocolate. In my opinion, for something so simple, the flapjacks were really good. They keep extremely well stored in an air-tight tin for up to a week.
 
I love experimenting with the foods that I cook, but I am as ever drawn to those recipes and foods that hold memories for me; foods that remind me of happy times and those I love. I really hope that in years to come, my children recall happy times and are reminded of me when they taste certain foods.
 

Ingredients:

225g butter
225g Demerara sugar
60g golden syrup
2 generous tblsp marmalade
275g porridge oats
50g dark chocolate, melted (optional)
 

Method:

1. Preheat the oven to 160C/Fan Oven 140C/Gas Mark 3. Line a 24cm square x 6cm high tin with non-stick baking parchment.
2. Put the butter, sugar, golden syrup and marmalade into a large saucepan and melt over a moderate heat, stirring occasionally until the sugar dissolves.
3. Tip in the porridge oats and mix everything together thoroughly.
4. Turn into the prepared tin and spread the mixture out evenly, pressing it down with the back of a spoon.
5. Bake in the oven for 35 minutes and then remove and allow to cool. When you initially remove it from the oven it may still be bubbling and look a little liquid - don’t worry it will firm up.
6. Allow to cool in the tin until firmed out and then remove the flapjack slab to a wire rack to finish cooling completely.
7. Drizzle with melted chocolate if liked and cut into 16 squares.
 
Cuts into 16 squares.